Saws
Coping With A Coping Saw – The Best Coping Saw
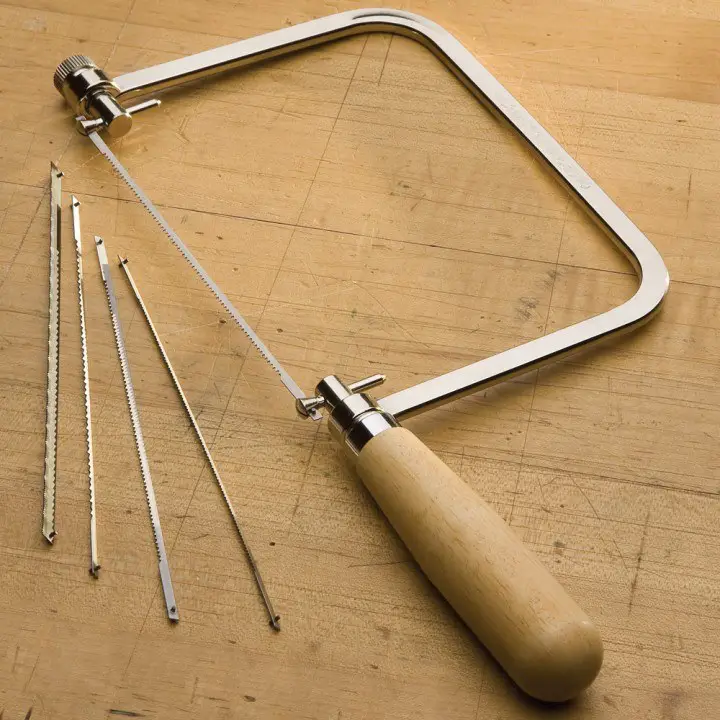
A coping saw consists of a thin, detachable, blade stretched across a deep U-shaped frame. It is one of the most versatile types of saws for fine and intricate woodworking.
They are generally cheaper and more robust than a fret saw.
Best Coping Saw
Although a lot of people would not describe a coping saw as a precision tool it can still be used to cut some very intricate and detailed shapes. They are less maneuverable than a fret saw and cannot turn as quickly due to the wider blade.
However a coping saw is a very effective tool in the right hands. They are cheap and easy to use and replacement blades are generally both cheap and easy to come by.
Some of the best coping saws will allow you to switch the blades 360 degree so that you can swap the actually cutting to either the push or pull stroke of the saw. This can give you more control especially on supper detailed and delicate work.
Robert Larson 540-2000 Coping Saw

The German made Robert Larson coping saw has an easy to adjust tensioning system - you just turn the handle.
It has a great ergonomic wooden handle and a nice stiff frame.
Specifications
- 6 inch blade length
- Cutting depth roughly 5 inches
- Accepts saw blades with pins
- Tension adjustment is by turning the handle.
Olson Saw SF63510 Coping Saw

The SF63510 Coping Saw from Olson is a great all round workhorse of a coping saw. It is designed very much so in the traditional sense and is exactly what you would look for in the best coping saw for your next project.
Specifications
- Hard wood handle
- 6.5 inch blades
- Blade can be switched to either cut on push or pull
- Standard pin end blade
- Can be tension-ed on either end
BAHCO 301 6 1/2 Inch Coping Saw

The Bahco 301 is a standard 6.5 inch coping saw that comes with a very high quality beech handle that is lacquered in orange. The blades are made from tempered and hardened carbon steel.
The frame is made from nickel plated steel and the whole saw has a very high quality feel.
Specifications
- Nickel plated steel frame
- 6.5 inch blades
- High quality frame
- Lacquered beech handle
Why is it called a coping saw?
This saw got its name from the type of joint it is typically used for, which is called a coped joint. A coped joint consists of two pieces of molding where one is cut to fit over the other. A typical application is for one piece to be cut flat to fit up against the corner of a wall and the second piece is shaped to fit over the first.
So what is a coping saw used for?
Well, as above, it was named after a coped joint. The thinness of the blade allows for the cutting of intricate shapes and tight curves in thin materials. This means that a coping saw is also very useful for decorative cuts.
Another ideal use for this type of saw is cutting shapes out from the middle of a work piece. The blade is detachable so that you can fit it through a hole in your material and then reattach the blade. You can then cut out the required shape and detach the blade to remove the saw.
There is one drawback to a coping saw, you can only use it for cutting thin stock (but not extremely thin). The size of the blade and teeth is far too small for large workpieces. You’ll need to limit your workpiece to about 1″ thick.
If you find that you can’t cut a tight enough curve with a coping saw then you’ll probably want to try a fret saw. The much deeper frame of the fret saw also allows for cutting further away from the edge of the workpiece.Both coping saws and fret saws are pretty cheap tools, so you’re not going to break the bank if you buy both.
Another use for a coping saw is to add the finishing cuts when removing the wood from a dovetail joint or any other awkward or detailed cut(see below). Once the main cuts are made with a back saw the coping saw is placed into one of the vertical cuts and then cut into the surplus material working towards the opposite vertical cut. Once the waste is removed the coping saw can then be used to remove the rest from the bottom edge of the dovetail. A rasp of file will then give a smooth finish to the inside surfaces of the dovetail.

Coping saw used in dovetail
How to Use a Coping Saw
Here’s a step by step guide on how to use a coping saw to cut a section from inside a work-piece:
- Draw the shape that you want to cut out onto your work-piece.
- Make sure that the frame of your coping saw is deep enough to allow you to make your cut (try a fret saw if not).
- Drill a hole in your workpiece inside the section you want to cut out. The hole needs to be bigger than the thickness of your blade. If there are multiple sections to be cut out then drill a hole in each.
- Detach the blade from the saw. For most coping saws you twist the handle to loosen the blade so that you can detach it.
- Pass the blade through one of the holes you cut and the reattach the frame.
- Use a smooth back and forth motion to cut from the drilled hole to the line you have drawn and then cut all the way around it.
- Detach the blade again and remove it from the workpiece. Then push the cut section out from the main piece.
- Sand the edges of the hole to get the finish that you want.
Learning how to use a coping saw correctly and safely will mean you will get much better results from the blades but it will also mean that you are less likely to break the blades.
And how to cope a joint
- Cut the first piece of molding so that it fits flush with the wall where you want to mount it.
- Place the first piece on top of the second piece, edge on, and trace around it carefully.
- Use your coping saw to cut out the required shape, remember to stay inside the line!
- Test the fit.
- Make any adjustments needed. You might be better of with a piece of sanding paper here rather than the saw again depending on how much needs to be removed.
- Fit both pieces to the wall and bask in the glory of your perfectly fitted joint.
Here’s a great video on YouTube demonstrating this method:
Coping Saw Blades
You’ll need a different coping saw blade depending on the material you’re going to be cutting.
The majority of coping saws should come with at least one starter blade. You may need to experiment with some different bladed to see which one suits your specific needs.
Another major factor in how well your oping saw will perform is how well you tension it. Depending on the particular saw model that you choose you will need to experiment with just how tightly you tighten the saw blade.
Wood
There are two types of blade for cutting wood, coarse and fine. This refers to the number of teeth per inch.
Coarse blades (less than 15 teeth per inch) will cut quickly which makes it easier to follow the line you are cutting (doesn’t really make sense, you would think it would be easier if you’re cutting slowly but that actually makes the blade more likely to wander).
Fine blades can cut tighter curves but will be slower. Most of the time you’ll want to use a coarse blade and then sand the resulting cut. You’ll only want a fine blade if you want to cut a very small radius curve.
Metal
The blade will be made of the same material as hacksaw blades, high-carbon steel.
Tile
You’ll want a tungsten, carbide-encrusted wire.
Plastic
This blade will have helical teeth and will cut in all directions; which lets it make sharp turns by simply changing the direction of pressure.
Power Coping Saw
Looking for a power coping saw? Well a power coping saw or an electric coping saw is what some people refer to as a scroll saw. Many hobbyist use the term power coping saw. I rarely however hear a carpenter or professional woodworker use the term.
So there you have it, the basics of using a coping saw.